This is for the 9mm and 40 cal models only. 45 ACP model uses different springs.
In my first PPQ trigger job I’ve used a spring from a pack of HomeDepot assorted spring kit, and it yielded a 2.5lb trigger. The trigger is great for bullseye but is inappropriate for action shooting. Many had expressed interest in a 3.5lb trigger, so I set out to find a spring that would do exactly that.
Introduction
Here is the spec of the PPQ’s sear extension spring:
- length: 0.75″ (19mm), 16mm on 45ACP
- outer diameter: 0.180″ (4.57mm)
- wire thickness: 0.022″ (0.559mm)
So the goal here is to find something with similar dimension but with a thinner wire thickness. I’m making the assumption here that the material is music wire.
It’s actually much harder than I thought to buy a spring at the specific size I want. Most manufactures have a minimum order of 50 to 100 springs, or general component stores don’t have something this small or at the thickness I want. After an evening of searching I found this place called Sodemann Springs. (link on the next page)
I ordered a wire thickness of 0.51mm, and with lengths 19mm and 15.75mm, as well as a 0.55 spring that’s 15.75mm long.
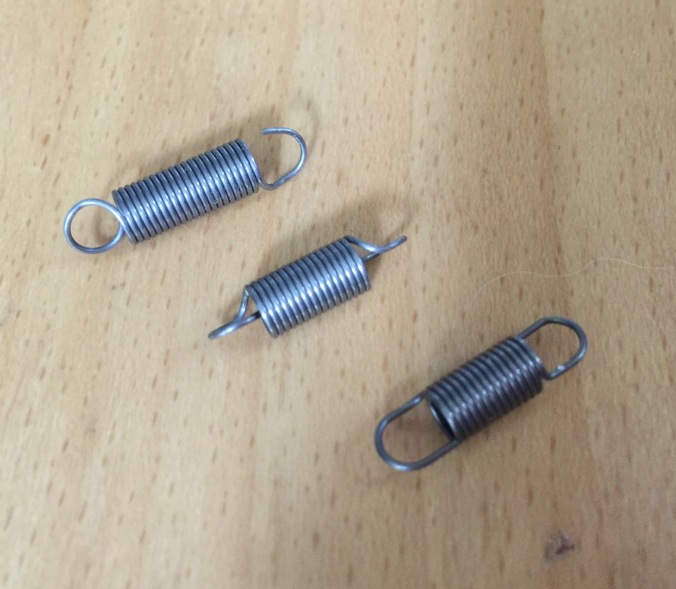
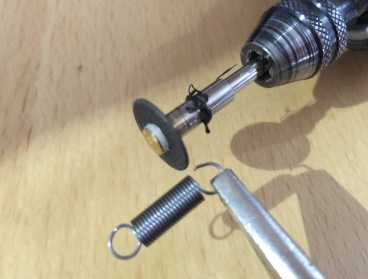
The loop on each end is closed off, so I needed to open one of the ends up to fit into the sear assembly. You can see that on the top spring shown above.
As it turns out, the 0.51mm spring that’s 19mm did the trick. It gave me a 3.5lb pull.
Note: Your mileage may vary as I’ve polished my internals, which might drop the poundage by a little.
And for those who are interested in making this mod, it’s an easy process that takes only minutes.
Parts and Tools
DISCLAIMER: No matter how easy the mod is, any modification which involves adjusting a firearm comes with the potential of compromising the safety of your firearm! Refrain from modding if you have no prior experience, and seek professional help instead. Also, any modified firearm should not be used outside of a firing range.
There are now multiple sources available for ordering the springs. I’ve put together a spreadsheet of all the spring retailers that I can find online. You can access it here:
(https://docs.google.com/spreadsheets/d/1pbUnT7q16B2AMA5GxBLiaHF-Z84RF1xFNYc7zm4-R6o/edit?usp=sharing)
If you’re on a budget, you can order from Ebay and get a set of springs for $10
Ebay Store Link (3.5lb)
Shipping takes about 10 days.
Mc Master offers a stainless steel spring that is the exact dimension of the factory spring, which is about a pound lighter. It’ll cost about $16, not bad at all
McMaster Purchasing Link (3.5lb)
Then there’s trusty Amazon who sells a pack of 10 for around $23.
Lastly, there’s Sodemann spring who has a great selection of springs. Unfortunately they are based in Norway. There’s a minimum order of $20 and shipping is $19. This place only makes sense if you’re buying a set of springs at different weights.
http://www.sodemann-springs.us/online-shop/search?pid=E01800200750M (3.5lb)
http://www.sodemann-springs.us/online-shop/search?pid=E01800240750M (5lb)
http://www.sodemann-springs.us/online-shop/search?pid=E01800260750M (6lb)
If you have the 45ACP version, here’s the 3.5lb spring
http://www.sodemann-springs.us/online-shop/search?pid=E01800180620S
Thanks to “imanoldfart” on Walther forums, he took the mod a step further and started replacing the firing pin block spring:
http://www.sodemann-springs.us/online-shop/search?pid=C00880100440S
What this mod does is that it’ll lower the trigger pull force that happen half way during up-take, providing a even smoother trigger pull before hitting the break!
Tools you’ll need:
- 3mm punch (optional, only if you remove sear block)
- needle nose plier
- bolt cutter, wire cutter or dremel with disk grinder
- tweezers
Step by Step Instructions – Quick Mod
Note that there are two sets of instructions. This quick mod only involves the slide removal. If you have trouble removing the extension spring, refer to the second set of instructions.
Step 1 – Remove the slide, and locate the extension spring
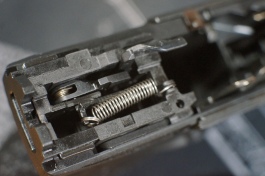
Step 2 – Remove the extension spring with a pair of needle nose pliers or tweezers. Note that the coil on the front side is wrapped up really well. Remove the back coil first so you can move the spring around to find the best angle in pulling it out of the sear casing. In the second picture you can see how I find an angle to help remove the spring.

Step 3 – Prepare the new spring. Straighten out the very end of the spring, and then you’ll need to cut the loop end short so you can fit it into the sear assembly housing easier. Cut with a Dremel or a mini bolt cutter. Use wire cutters only if there’s no other choice.
Note that music wire is very hard (C41 – 60), so it’ll dent even the best wire cutters (C63-65). If you have to use a wire cutter, use a cheap, small bolt cutter and not a wire cutter.
Step 4 – Assemble the new extension spring to the sear block. It should be easier than removing the spring in comparison.
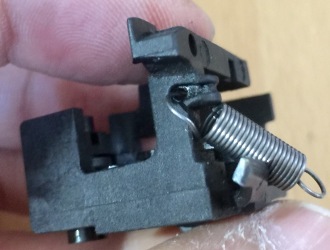
For those who are comfortable taking things apart and have a 3mm punch handy, here are the instructions for taking the sear block apart.
Step by Step Instructions – Sear Block Removal
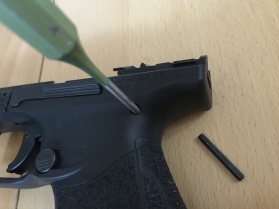
Step 1 – Remove the 3mm pin behind the slide lock (if I need to tell you to remove the slide, this guide ain’t for you 🙂
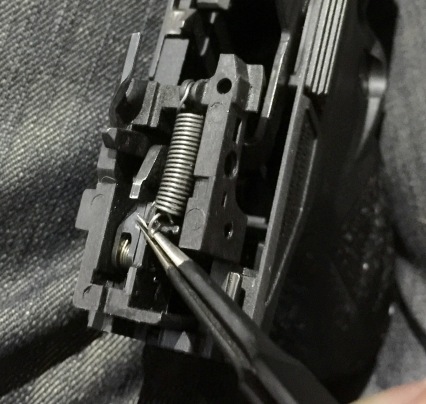
Step 2 – Slide out the sear assembly housing. Orient the right side of the pistol facing up, because there is a metal part (trigger bar guide) and would come loose. Now’s also a good time to clean your sear housing. (see how easy it is on the PPQ?)


Step 3 – Prepare the new spring. Straighten out the very end of the spring, and then you’ll need to cut the end short (about 2mm) so you can fit it into the sear assembly housing easier. Cut with a Dremel or a mini bolt cutter. Use wire cutters only if there’s no other choice.
Note that music wire is very hard (C41 – 60), so it’ll dent even the best wire cutters (C63-65). If you have to use a wire cutter, use a cheap, small bolt cutter and not a wire cutter.
Step 4 – Now you can fit the spring into the sear housing. It’s going to be a tight fit. I found it easier to place the spring at a 45 degree angle at the beginning.

Step 5 – Reassembly. Fit the housing in part way through, then take your tweezers and slip the spring back into place.
Hammer the pin back and install the slide and you’re all set.
Testing
It goes without saying but you’ll get to feel the new trigger by dry firing the pistol. Do this a couple of times, also rack and slam the slide back to battery and make sure the spring will stay in place. Once you’re comfortable with how the trigger feels, have fun at the range!
The PPQ is really easy to take apart compared to many pistols I dealt with, and all these non invasive mods make the PPQ one of the most flexible pistols out there. Hope you find this useful! Have fun shooting!

Lanzer,
Read this info about your 3.5# PPQ trigger mod. I am a new PPQ owner and would like to increase the trigger pull. I would like to carry it, but worry about the light trigger and short reset compared to the triggers on my Kahr CW9 and CM9. Can you give me specifics about which springs I should try from Sodemann?
Something thicker than 0.22″ would be 0.24″ and 0.26″. I suggest trying these two and see which one you like. Sorry I have no idea what are the resulting load from these springs:
http://www.sodemann-springs.us/online-shop/search?pid=E01800240750M
http://www.sodemann-springs.us/online-shop/search?pid=E01800260750M
Please let me know how they work out for you!
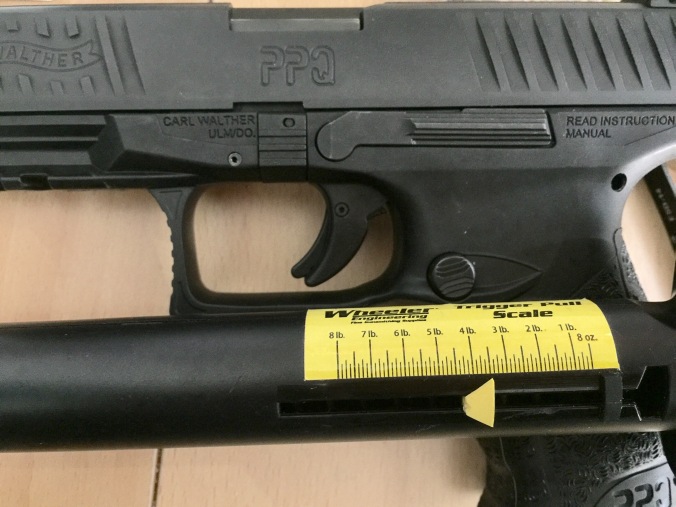
I purchased the spring from McMaster. Trigger pull increased from 4.5 lb to 5.0 lb NOT 3.5 lb.
Sorry about that, which spring from Mc Master did you ordered? I need to update the page if I listed the wrong one.
I wondered the same. McMaster has exactly the same dimension and wire size. So the pull weight should be similar? By comparison, Sodemann uses thinner wire and is quite lighter, i.e. 2.6lbs/in vs 3.8lbs/in. My McMaster spring is coming, so I will find it out.
I’m sorry the Mc Master spring didn’t end up working. I bought my spring from Sodemann and the other entries were springs with the same dimensions at similar reported spring rates. If it ended up being heavier, then either McMaster or Sodermann’s supplier probably isn’t providing the right info, which sucks and I’m sorry. I’ll add your note to the spreadsheet.
I installed the spring in my PPQ M2 5 inch pistol. Wow what a difference. The stock trigger felt good, maybe 4-4.5 lbs but now it’s about 3lbs. It is the best trigger I have in a polymer pistol and rivals the best triggers I have on my 1911 single action pistols. I didn’t even have to take the sear housing out. A nice 5 minute job. Thank you sir!
Great info that I’ve put to good use!
Hi there Lanzer,
I just found your site and have gone thru some of the postings on the PPQ.
I bought my Walther PPQ M2 in Aug/2016 and it is my first and only pistol so far. I have done some modifications to it. I added:
1. I changed the factory sights for Truglo TFX pro sights.
2. I changed the 4″ barrel for a 4.6″ threaded barrel.
3. I changed the Recoil Guide Rode Assembly for the DPS system (silver spring / gold spring)
I have been noticing a grinding on the take up pull of the trigger. when I pull the trigger slowly i feel this grinding affect and the movement is not a sooth and continuous one. for this reason i have purchased the Apex forward set trigger and Apex tune trigger bar. it should arrive next week. this trigger is not meant to reduce the weight of the trigger. it is just meant to reduce the travel distance at initial take up and reset distance. from what i have research the position the the Apex trigger partially extends the trigger return spring in a normal trigger position thus reducing the take up distance.
i want to reduce the weight of the trigger using the information on this post.
Since the the trigger return spring is extended. Will the new trigger return spring have a even more reduced weight pull? Would you be able to look into it so I can determine if I go ahead and change the trigger return spring at the same time as I set the new Apex trigger?
i appreciate any comments in this regard since i know very little about gunsmith staff.
Thanks a lot for the great information posted in regard to the Walther PPQ
There are members in the Walther forums who had implemented my guide along with the Apex trigger and they couldn’t be happier. I suggest reading through this thread:
Forum Thread
Thanks a lot Lanzer.
I checked the thread and it is very informative.
i received my new trigger today and i just finished installing it and it is so amazing. the take up is so short and the reset even more.
Going tomorrow at lunch to try it at the range. I want so see it impacts accuracy. I did noticed an improvement in target accuracy when I dry fired at home just a few minutes ago. the trigger feels a lot lighter then the original Walther trigger
In the thread you point out some guys where a bit concerned about having the spring with the Apex since the take up is so short and the trigger weight would feel even lees than with just the spring. their concern about an accidental discharge or when you use the short reset since it is so short and light.
I’ll wait a while while I get accustomed to the new trigger and then I’ll decide if i do the spring. I only have one gun and it is for range shooting and home defense.
I ordered a Kydex holder from reign tactical but it is taking a bit longer then expected. one I get I plan on carrying concealed. I’ll see how conformable it is. If it feels to big to carry i’l get something smaller but i need something fully ambi (slide release and mag release).
Thanks a gain for all the info.
First try, trigger just a little to light. Not enough strength to return the trigger. But just by cutting 3 coils off and making a new hook. Couldn’t be happier. Cappie Killmore.
Have you ever came up with the spring#,s for the PPQ .45?Trigger return and Fireing pin block?
The PPQ 45 actually uses a shorter trigger return spring. It’s 15.75mm instead of 19mm, so as long as you take that into consideration you can find springs that work similarly
I think Century Spring in Los Angeles has the spring needed. Unfortunately they have a $50.00 minimum or a $15.00 surcharge fee plus spring costs. Shipping extra. The spring #80147 (music wire) is the closest to the 3.5# trigger spring indicated. Length is .75″, wire diameter 0.020″ and a spring diameter of 0.180″. They currently have several thousand in stock! Single price is just under $8.00 and shipping is $15.00 – so about $40.00 total. Group buy?
Hi John, I’ve updated the journal with a link to my Google spreadsheet that has more retailers. Between Jones Springs and Amazon you should be able to get one for much cheaper.
Thank you! I had not seen the spreadsheet before. Anybody have a couple of extra springs?
Not a lot of fun getting the hair springs installed in the sear group but it was worth the effort to polish the sear faces.
I used a 6-32 tap for the creep mod as I had that on hand – GREAT mod!
I had a rough trigger feel after doing some of the mods. Found the slide lock spring was not seated properly and dragging on the trigger itself.
Quite a few surprised people at the range at how nice a trigger the PPQ M1 now has.
Lancer, Thanks again!
John Rounds
What a great article! Thank you very much for all the research! I was able to order both springs from Sodeman. They accepted an order of 1 of each plus shipping for like $30, and it arrived in 4 days.
I just picked up a Walther PPQ M2 and was looking for ways to upgrade the trigger. Doing this spring mod along with adding an Overwatch Precision trigger, brought the trigger pull down to 2lb 10.6oz
Absolutely love it!
Thanks again!
Hello Lanzer,
Really nice writeup. I have a PDP 4”, since it supposed to share DNA with the PPQ, i might give it a shot with the two of the lighter Sodemans.
A quick question though: your spreadsheet mentions option for changing the FPS spring also. What should the specs be for the FPS spring, and the lighter FPS spring? Thank you in advance!
The mixed set sold at Home Depot actually had a spring that worked really well to replace the FPS spring. Sorry I should had documented which one I used when it was fresh in my mind. I’ll see if I can find more info on it and reply again.
Sorry for posting early, should have done my homework better. Using the specs of the FPS found on the spreedsheat i tried to find some of Sodemann’s offerings.
I’m no way an expert, i just tried to make up what would do the job – i was looking for springs with the same dimensions, but with less wire diameter (hence weaker spring) and/or less spring constant. Hope my logic is OK, please advise if otherwise.
Anyways, using the method described above, this is what i’ve found in Sodemann’s offerings.
This might do for a light FPS:
https://www.sodemann-springs.us/c00880100500s
And this one should work as a “near stock” FPS:
https://www.sodemann-springs.us/c00880100440s
This should do for the spring you used:
https://www.sodemann-springs.us/e01800200750m#
…and this would be the lightest that still does the job:
https://www.sodemann-springs.us/e01800180750m
I’m aiming for the 2.3 lbs trigger pull – i hope i read yur spreedsheat right, if yes i assume you need a wire thicknes of 046 mm (just like e01800180750m), i was – and guess still am – unsure what FPS one should use in the mix to qchieve this 2.3 lbs trigger pull.
Sorry for the long reply, and again, your informative post is much appreciated.
You’re right about the idea that you want a spring at the same dimension, but with a smaller wire, hence lighter spring rate. The one I used had a spring rate of 1.1 pound per inch, and the one you found is 1.9, so it will be just a marginal difference from stock. Just keep looking for something with a smaller wire and spring rate. The Amazon link still works but unfortunately the price had risen form $21 to $48. Ouch.
It’s too bad most of the links I found are no longer working. It was really hard to find springs at specific dimensions and force at a reasonable price. It took me many hours to find just those few back in 2017.
Understood. Regarding the FPS i figured i should aim for soemthing similar in dimension but with less spring constant.
If i read your data correctly the stock FPS length is 0.5 and its outer diameter is 0.88.
I’m aiming for something very close, but with a spring rate closer to 1.1 lb/in. This is what i’ve found:
c00570070500s
https://www.sodemann-springs.us/c00570070500s
This has the same length (0.5) but the external diameter is less (0.06 vs 0.88) – spring rate is 1.26 lb/in
c00880080440s
https://www.sodemann-springs.us/c00880080440s
This has the same external diameter (0.9) but its a tad shorter (0.44 vs 0.5) – spring rate is 1.26 lb/in
I’m leaning towards the idea the replacement spring should be closer in dimensions tot he stock one, so i think the second one should be better (it’s shorter but not as by much as the first one is slimmer compared to stock).
Though the FPS might be less important, as some think the pull weight is determined mostly by the TRS, any advise would be welcome.
Amazon is not an option for me, as i live in the EU, they won’t deliver here, but Sodemann is quite close, hence i’d like to find something from their offerings.
Regarding the TRS, what spring constant shall i look for if i’d like to replicate the 2.3 lbs trigger pull displayed on your spreedsheat?
The springs i found both have the same dimensions (length, outer diamater, wire thickness even), the confusing part is that however the dimensions are the same they have different spring rates despite the fact the wire thickness is also same.
Both of the springs are the same in length (0.75) and outer diameter (0.18) and wire thickness (0.02)
e01800180750m – spring rate: 1.48 lb/in
e01800200750m – spring rate: 2.68 lb/in
So i don’t seem to have an option to go for same lenght and outer diameter but less wire thickness as the thickness is the same.
Anyways, i can’t determine what the spring rate of the TRS should be, do you have any data regarding this?
Sorry for the typos, as mentioned, writing from the EU, Hungary, auto-correct does have it’s own way of doing things.
And again, thank you.
For the FPS spring I would go for something at the same length but in a smaller diameter. In fact, that’s what I’m currently using. If the FPS assembly is properly polished and lubricated, it would have less of an impact on your pull weight, though once the trigger return spring gets lighter, the effect of the FPS gets more and more apparent. You can easily test this just by removing the FPS assembly and feeling the trigger weight. Fort the springs you listed, chances are you’re looking at different materials. Stainless steel springs have less force than spring steel. Recently someone reported that a 3.5lb/in spring resulted in a 5lb trigger pull, so I would start with the 2.68lb/in spring and see where it goes. Have fun!
Hello,
Thought i give you a follow up of how things turned our with the PDP spring saga.
Springs arriwed.
All of them are the same dimensions as the factory TRS, by this i mean same unloaded lenght, same outer diameter, the only variable is the spring diameter.
I ordered 4 trigger return springs and 2 firing pin block springs.
I did not install the firing pin safety springs, as my PDP currently seats a red dot and did not want the hassle that comes with taking it off then mounting it again.
So, factory FPS, and no polishing.
Anyways, with the setup mentioned above, i applied 3 Sodeman springs (the 4th i did not bother to apply as it seemed it would provide something like the factory bronze spring).
I meassured trigger pull weight on two points: on the bottom and on the lower 1/3 of the trigger shoe.
I’ll post the data both in metric and imperial units.
The results:
e01800200750s
trigger pull weight on the bottom of the trigger shoe: 3 lbs / 1360 gramms
trigger pull weight on the lower 1/3 of the trigger shoe: 3lbs 8 oz 1587 gramms
spring diameter: 0.51 mm / 0.02 in
spring constant: 0.39 N/mm / 2.23 lb/in
Felt ok, to be honest didn’t feel much heavier than the others.
e01800180750m
trigger pull weight on the bottom of the trigger shoe : 2 lbs 10 oz / 1190 gramms
trigger pull weight on the lower 1/3 of the trigger shoe: 3 lbs / 1360 gramms
spring diameter: 0.46 mm / 0.02 in
spring constant: 0.26 N/mm / 1.48 lb/in
For now i’ll keep this one installed as it seems to work best, no grit, crips break, and still a nice pronounced reset.
e01800180750s
trigger pull weight on the bottom of the trigger shoe: 2 lbs 8 oz / 1134 gramms
trigger pull weight on the lower 1/3 of the trigger shoe: 3 lbs 4 oz / 1474 gramms
spring diameter: 0.46 mm / 0.02 in
spring constant: 0.22 N/mm / 1.26 lb/in
reset is not as pronounced, plus the trigger felt a bit grity or loose -and did not feel that much lighter than the two springs mentioned above.
The Dynamic Performance Trigger came with a silver TRS, while the factory trigger with the factory sear housing came with a bronze TRS. The silver in the Dynamic Sear Cage felt heavier, so before the Sodeman srpings arriwed i swapped the springs, here are the results of the Dynamic Trigger – Dynamic Sear cage – Factory bronze spring combo:
Factory bronze
trigger pull weight on the bottom of the trigger shoe: 3 lbs 8 oz / 1587 gramms
trigger pull weight on the lower 1/3 of the trigger shoe: 4 lbs / 1814 gramms
The reset is more pronounced, but the trigger felt a bit grity sometimes.
Sorry for the long post, thought it could be a help for those looking to upgrade their PDP with the Dynamic Sear and aftermarket springs.
I think beter results and/or better trigger charactereistics could be achieved with some polishing and/or swapping the TRS, will post if i made up my mind tod o these mods as well.
I’m comfortable with changing parts that does not result in changing dimensions and/or angles, thus changing springs is ok with me, polishing could be ok as well as long as it dosen’t remove material in an amount that would result in changing angles, contatct points and whatnot. So if there’s an advice on how to polish safely it’s welcome (ps: i have a dremel with polishing heads plus compound).
Still, with no polishing i can only confirm what many Walther owners had: upgrading to Dynamic Sear is a huge improvement, as this results in a way better trigger break.
Stay safe.
Thanks for the detailed report. I’ll update my spreadsheet with your data to hopefully benefit others.
My trigger was also gritty out of the box, but a little bit of polishing with my Dremel and it’s now completely smooth. If you don’t have a dremel just get a tiny rechargable one for $20 on Amazon, doesn’t matter if it takes 3 times longer to polish a few spots. You can find details on my PPQ trigger job post if you haven’t seen it already.
Have fun shooting!