Should I sorting bullets when reloading?

Part of the fun in reloading is trying to make the most accurate load, so naturally, minimizing variances is part of the game.

The Nosler 185gr bullets varies in weight by about 1.8 grains, which is pretty good.  Though I still wonder if a 1% variance would make a difference?

I usually sort all my ammo within a 0.2gr tolerance, but this time I made a second batch where the bullets weren’t sorted, and headed for the range…

First I started with the unsorted ammo:

FullSizeRender 5

I was secretly hoping that there would be no difference, since I would like to not have to sort bullets anymore.  But for one reason or another, I can’t get the groups down. (one ammo had a FTF)

Now I switched over to the sorted ammo:

FullSizeRender 3

Getting tight groups with the sorted bullets were much easier.

I then proceeded to shoot free hand:

IMG_2555

Feels like my freehand performance is better with more accurate ammo (duh).  In hindsight, I should have benched all those shots to get better data.

I definitely don’t have enough data to have a solid conclusion yet, and I’ll be shooting more with sorted and unsorted ammo in the future.  Though for now I tend to believe that even for 25 yards, weighing ammo still matters a bit.  More importantly, it’s the process of trying to figure things out that’s fun and enjoyable.  Back to reloading!

Platform:

IMG_8974

Pistol used is a 1911 built from an 80% lower with a Kart non-ramped 5″ barrel and STI slide.

Range Report – reloading with Vihtavuori

My 45ACP 1911 built from a 80% lower had been sitting on the shelf for almost 2 years, finally I’ve decided to mount a red dot sight on the unit and test out just how accurate this pistol is.

I got a couple of powder that are great for 45ACP.  Vihtavuori N320, Winchester 231, and Bullseye to name a few.  I’m going to start with N320 first as I’ve heard of great things about this powder, and as it turns out, this pricy power didn’t disappoint.

Here’s what I was reloading with:

  • Nosler 185gr JHP bullet
  • New brass with small primer pockets
  • CCI primer
  • Lee turret reloader

The Nosler data showed that 6.2gr of N320 yield the best results, so I started with that recipe and made the following ammo:

  • 6.2gr @ 1.20″ OAL
  • 6.2gr @ 1.205″ OAL
  • 6.2gr @ 1.21″ OAL
  • 6.2gr @ 1.22″ OAL
  • 6.2gr @ 1.23″ OAL
  • 6.2gr @ 1.24″ OAL
  • 6.2gr @ 1.25″ OAL
  • 6.3gr @ 1.20″ OAL
  • 6.3gr @ 1.21″ OAL
  • 6.3gr @ 1.22″ OAL
  • 6.3gr @ 1.23″ OAL
  • 6.3gr @ 1.24″ OAL
  • 6.3gr @ 1.25″ OAL

Simple set of ammo for start, and as it turns out, the 1.25″OAL produced the best results.

This slideshow requires JavaScript.

I was not expecting that the 1911 I put together can be this accurate, so that’s certainly great news.  Next I’ll need to keep shooting with that recipe and find out if I was just being lucky.

PPQ Red Dot Mount on the cheap

Recently added a Burris Fastfire on my 1911, and I noticed that the 1911 adapter plate actually fit the top of the PPQ pretty well.  Well?  It’s time to make a dovetail mount for the Fastfire adapter plate!

First, the mounting plate

s-l500 (1).jpg

You can get one from Burris for $45, or grab one from Amazon or Ebay for $20.  Just search for “1911 std Slide Mount Base for Red Dot“.  You’ll want one that has the dovetail near the back.  It’s called the “Standard 1911” sight, NOT the “1911 Novak” type.

IMG_2333

The down side to the cheap mount is that the mounting screw for the red dot scope is very short.  It barely grabs onto the mounting plate and very easy to strip.  I suggest getting longer ones, adding 5 bucks to the budget. (look for #6-40 flat screws)

Update: The newer 1911 mounts comes with two sets of mounting screws that are longer than the old model.  Don’t need to buy extra screws anymore!

Time for the fun part.

IMG_2295

I bought a steel bar from Home Depot for a completely different project, and the left over piece was perfect for the dovetail.  It’s technically not shaped like a dovetail but I dunno what to call it. 🙂

The CNC mill makes the job easy.  An hour later we have our finished piece

IMG_2326

The two holes need to be threaded at #4-48, which is an uncommon size.  Have to grab a tap, an extra few bucks.

After milling the back side, the dovetail fits perfectly.  The dimension is pretty straight forward, the only tricky part is the height, which should be about 0.145″

IMG_2323

When mounted, the plate sits on the outer edges of the slide, which is exactly where I want it to sit.  There’s a 0.2mm clearance on the top.

IMG_2324

The plate sticks out a little bit at the back, the burris plate will sit 1/16 inch forward.

IMG_2330

All done!  $30 later, I’m ready to shoot with the Fastfire!

I drew the dimension of the dovetail out on a napkin, I’ll clean it up and post it later.

Hope you find this useful.  I plan to make a whole bunch of dovetails since I have more barstock left.  Feel free to contact me if you want to buy one. 🙂

PPQ Adjustable Creep Conversion Guide

PPQ is the most versatile pistol for those who want to customize their pistol at home.  Not only can you customize your trigger pull weight, but you can also adjust the weight of the break.  And now, you can mod to have an adjustable creep as well.  Best of all, we can do this without grinding away any metal.  In this guide I’ll share with you how you can make your PPQ perform even better than the amazing pistol it already is.

Tools needed:
IMG_8435First you’ll need:

  1. set screw (2.5mm in size, 5mm or 0.2″ in length, 3mm also works)
  2. 2.5mm tap (also called the M2.5 x 0.45 tap, or M3 x 0.5 if you’re using 3mm)
  3. drill bit (2mm for M2.5, 2.5mm or #39 drill bit for M3)
  4. hex wrench (1.5mm)

** I used 3mm in my example because I just happen to have a bunch of 3mm set screws lying around

Difficulty: Moderate.  Involves using a drill press and a tap.  However, it’s much safer than many trigger jobs that may create irreversible results

DISCLAIMER: No matter how easy the job is, modifying your firearm involves risks that may result in injuries or death.  It will also void your warranty.  If in doubt, seek help from a professional.

DISCLAIMER 2: Any pistol with a trigger job performed should not be carried or used for self defense purpose.

Step 1:

Take apart your sear housing.  For more info on how to do this, refer to my PPQ Trigger Job Guide.

Follow the picture below and drill a hole through the sear housing

IMG_8430 textIMG_8418

You definitely do not want to drill a hole that’s tilted, so please use a drill press.  Do note that the hole is drilled horizontal to the gun.  The front side of the sear housing is slanted, so you will be drilling on a tilted surface.  I suggest drilling a pilot hole first with the drill perpendicular to the surface, or use a piloting bit if available.

Step 2:

Run your tap through the hole.  Keep turning until the tip of your tap reaches the end of the hole but don’t tap all the way through.  You want to purposefully leave the hole really tight at the end so the screw will stay in place when submitted to vibrations.

Step 3:

Screw the set screw in place.  You should feel the screw tightening up a lot near the end, but if the hex wrench starts to bend due to stress, go back to step 2 and tap through a bit more and try again.

Stop when the set screw reaches the inside of the housing.  Here I show the screw sticking out by 0.5mm or so.   Once you reach this depth, unscrew until the set screw is aligned with the wall.  If any plastic is bulging out, you can shave it off with an Xacto knife.

IMG_8427

Step 4:

Calibrations, calibrations, calibrations.  First assemble the sear housing back into the frame.  Start with only a tiny bit of the set screw exposed.  Next, insert an empty magazine into the gun.  Now go through the following:

  1. Tighten the set screw by 1/4 turn
  2. Install the slide
  3. Rack the slide and lock it back with the slide release lever
  4. Hit the slide release lever, allow the slide to slap into battery with force **
  5. Pull the trigger as you feel the amount of creep present
  6. Remove the slide

** do not release the slide by hand. The point here is to exert the maximum amount of force on the frame to test for stability

Just repeat the above sequence until the sear does not engage after hitting the slide release lever, or if you pull the trigger all the way and cannot find the break.  When this happens, it means that the sear is too far in its resting position.  Simply loosen the set screw by 1/4 turn and keep testing at this position 10 more times to make sure that the gun is working properly.

IMG_8431

That’s it!  You’re now the proud owner of a pistol with an adjustable creep.

Results:

With a caliper I measured the creep before and after the mod.  And the results are:

Stock trigger: 1.2mm creep

Modified trigger: 0.45mm creep

The result is about 60% reduction.  I’m very happy with the result and couldn’t wait to test the new trigger.

Range Report:

I tested my mod at the range and pumped 200 rounds into steel with much delight.  Not one single failure.

Haven’t been shooting for a few months but getting 2.5″ groups with this trigger was pretty easy.

IMG_8438

Hope you’ll find this guide useful!  Feel free to contact me if you have any questions regarding the procedure.


PPQ trigger mod to 3.5 pound

This is for the 9mm and 40 cal models only.  45 ACP model uses different springs.

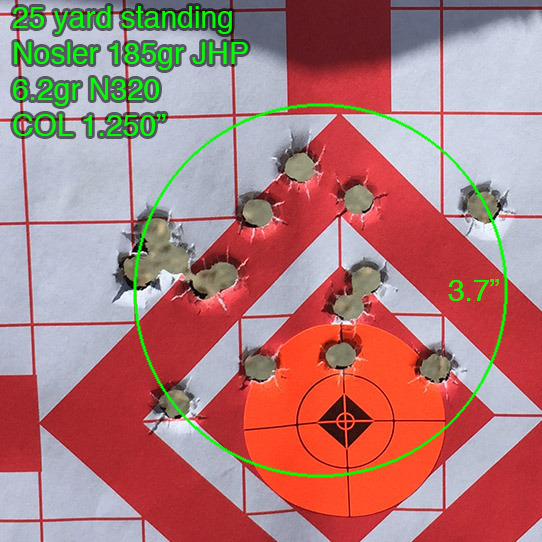
In my first PPQ trigger job I’ve used a spring from a pack of HomeDepot assorted spring kit, and it yielded a 2.5lb trigger.  The trigger is great for bullseye but is inappropriate for action shooting.  Many had expressed interest in a 3.5lb trigger, so I set out to find a spring that would do exactly that.

Introduction

Here is the spec of the PPQ’s sear extension spring:

  • length: 0.75″ (19mm), 16mm on 45ACP
  • outer diameter: 0.180″ (4.57mm)
  • wire thickness: 0.022″ (0.559mm)

So the goal here is to find something with similar dimension but with a thinner wire thickness.  I’m making the assumption here that the material is music wire.

It’s actually much harder than I thought to buy a spring at the specific size I want.  Most manufactures have a minimum order of 50 to 100 springs, or general component stores don’t have something this small or at the thickness I want.  After an evening of searching I found this place called Sodemann Springs.  (link on the next page)

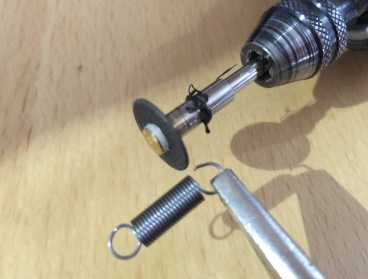
I ordered a wire thickness of 0.51mm, and with lengths 19mm and 15.75mm, as well as a 0.55 spring that’s 15.75mm long.

FullSizeRender 4

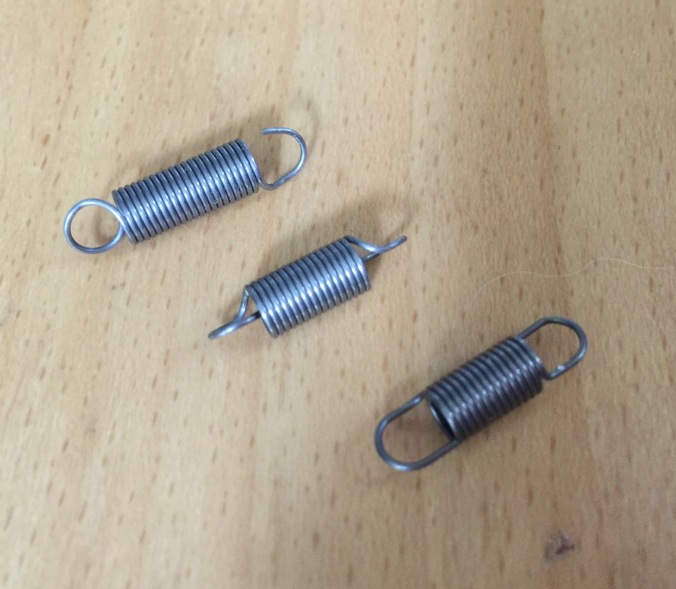
The loop on each end is closed off, so I needed to open one of the ends up to fit into the sear assembly.  You can see that on the top spring shown above.

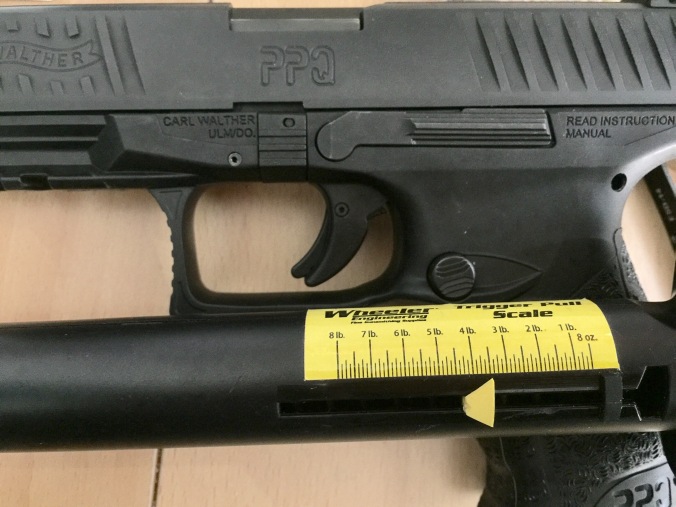
As it turns out, the 0.51mm spring that’s 19mm did the trick.  It gave me a 3.5lb pull.

FullSizeRender 5

Note: Your mileage may vary as I’ve polished my internals, which might drop the poundage by a little.

And for those who are interested in making this mod, it’s an easy process that takes only minutes.

Parts and Tools

DISCLAIMER: No matter how easy the mod is, any modification which involves adjusting a firearm comes with the potential of compromising the safety of your firearm!  Refrain from modding if you have no prior experience, and seek professional help instead.  Also, any modified firearm should not be used outside of a firing range.

There are now multiple sources available for ordering the springs.  I’ve put together a spreadsheet of all the spring retailers that I can find online.  You can access it here:

Spring Retailer Spreadsheet

(https://docs.google.com/spreadsheets/d/1pbUnT7q16B2AMA5GxBLiaHF-Z84RF1xFNYc7zm4-R6o/edit?usp=sharing)

If you’re on a budget, you can order from Ebay and get a set of springs for $10
Ebay Store Link (3.5lb)
Shipping takes about 10 days.

Mc Master offers a stainless steel spring that is the exact dimension of the factory spring, which is about a pound lighter.  It’ll cost about $16, not bad at all
McMaster Purchasing Link (3.5lb)

Then there’s trusty Amazon who sells a pack of 10 for around $23.

Lastly, there’s Sodemann spring who has a great selection of springs.  Unfortunately they are based in Norway.  There’s a minimum order of $20 and shipping is $19.  This place only makes sense if you’re buying a set of springs at different weights.

http://www.sodemann-springs.us/online-shop/search?pid=E01800200750M (3.5lb)
http://www.sodemann-springs.us/online-shop/search?pid=E01800240750M (5lb)
http://www.sodemann-springs.us/online-shop/search?pid=E01800260750M (6lb)

If you have the 45ACP version, here’s the 3.5lb spring
http://www.sodemann-springs.us/online-shop/search?pid=E01800180620S

Thanks to “imanoldfart” on Walther forums, he took the mod a step further and started replacing the firing pin block spring:
http://www.sodemann-springs.us/online-shop/search?pid=C00880100440S 

What this mod does is that it’ll lower the trigger pull force that happen half way during up-take, providing a even smoother trigger pull before hitting the break!
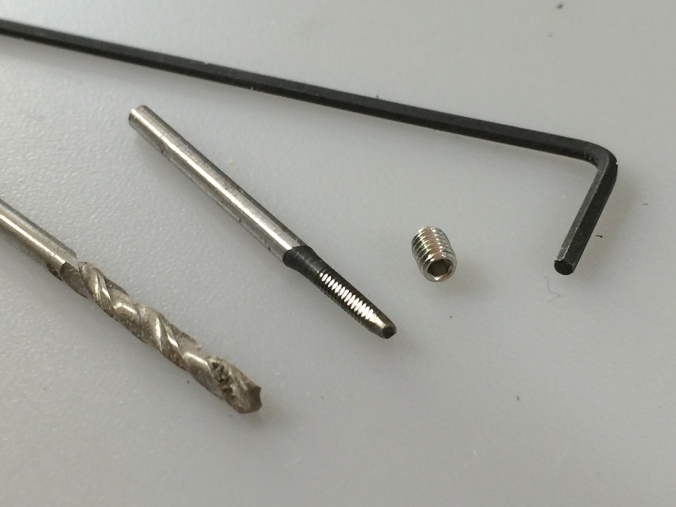
Tools you’ll need:

  • 3mm punch (optional, only if you remove sear block)
  • needle nose plier
  • bolt cutter, wire cutter or dremel with disk grinder
  • tweezers

Step by Step Instructions – Quick Mod

Note that there are two sets of instructions.  This quick mod only involves the slide removal.  If you have trouble removing the extension spring, refer to the second set of instructions.

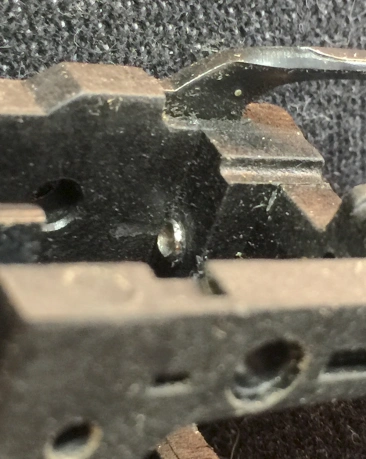
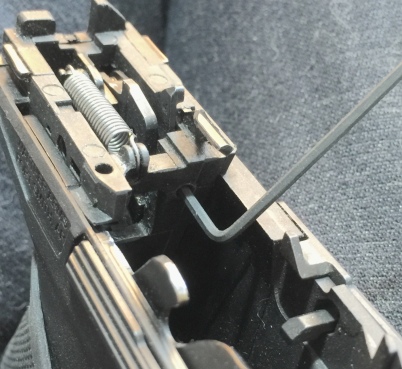
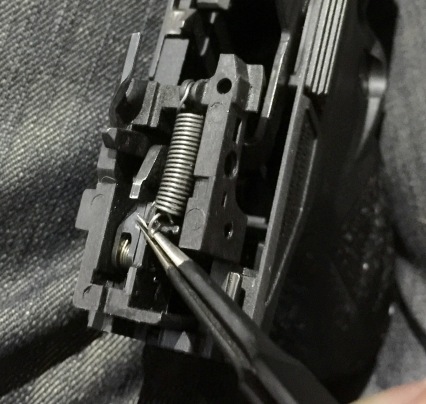
Step 1 – Remove the slide, and locate the extension spring

DSC04532

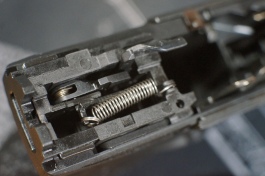
Step 2 – Remove the extension spring with a pair of needle nose pliers or tweezers.  Note that the coil on the front side is wrapped up really well.  Remove the back coil first so you can move the spring around to find the best angle in pulling it out of the sear casing.  In the second picture you can see how I find an angle to help remove the spring.

FullSizeRender 13 FullSizeRender 6

Step 3 – Prepare the new spring.  Straighten out the very end of the spring, and then you’ll need to cut the loop end short so you can fit it into the sear assembly housing easier.  Cut with a Dremel or a mini bolt cutter.  Use wire cutters only if there’s no other choice.

Note that music wire is very hard (C41 – 60), so it’ll dent even the best wire cutters (C63-65).   If you have to use a wire cutter, use a cheap, small bolt cutter and not a wire cutter.

FullSizeRender 7

Step 4 – Assemble the new extension spring to the sear block.  It should be easier than removing the spring in comparison.

For those who are comfortable taking things apart and have a 3mm punch handy, here are the instructions for taking the sear block apart.

Step by Step Instructions – Sear Block Removal

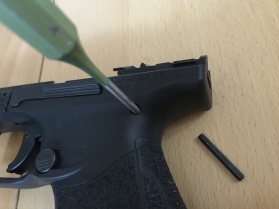
Step 1 – Remove the 3mm pin behind the slide lock (if I need to tell you to remove the slide, this guide ain’t for you 🙂

IMG_6857

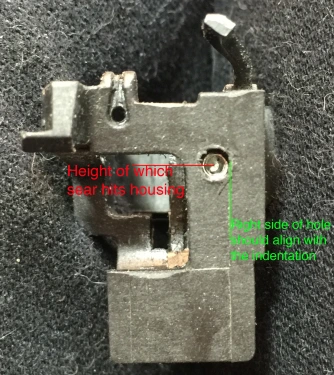
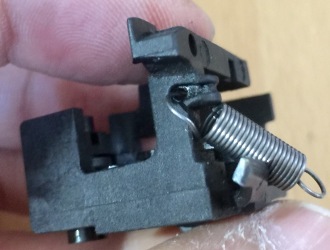
Step 2 – Slide out the sear assembly housing.  Orient the right side of the pistol facing up, because there is a metal part (trigger bar guide) and would come loose.  Now’s also a good time to clean your sear housing.  (see how easy it is on the PPQ?)

Step 3 – Prepare the new spring.  Straighten out the very end of the spring, and then you’ll need to cut the end short (about 2mm) so you can fit it into the sear assembly housing easier.  Cut with a Dremel or a mini bolt cutter.  Use wire cutters only if there’s no other choice.

Note that music wire is very hard (C41 – 60), so it’ll dent even the best wire cutters (C63-65).   If you have to use a wire cutter, use a cheap, small bolt cutter and not a wire cutter.

FullSizeRender 7

Step 4 – Now you can fit the spring into the sear housing.  It’s going to be a tight fit.  I found it easier to place the spring at a 45 degree angle at the beginning.

FullSizeRender 6

Step 5 – Reassembly.  Fit the housing in part way through, then take your tweezers and slip the spring back into place.

FullSizeRender 13

Hammer the pin back and install the slide and you’re all set.
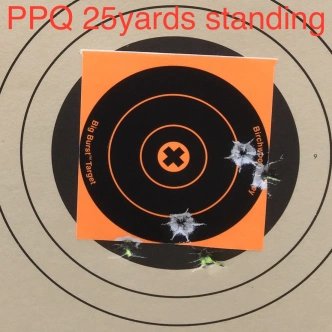
Testing

It goes without saying but you’ll get to feel the new trigger by dry firing the pistol.  Do this a couple of times, also rack and slam the slide back to battery and make sure the spring will stay in place.  Once you’re comfortable with how the trigger feels, have fun at the range!

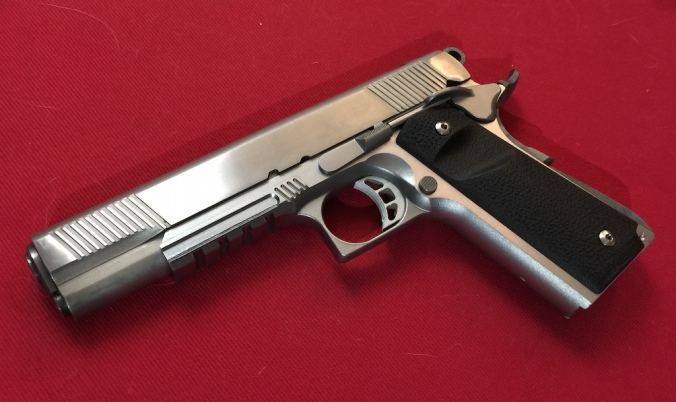
The PPQ is really easy to take apart compared to many pistols I dealt with, and all these non invasive mods make the PPQ one of the most flexible pistols out there.  Hope you find this useful!  Have fun shooting!

Homemade Magnetic Quad Magazine Pouch

Recently started shooting steel, after having shot paper targets for 15 years it’s quite a humbling experience to force myself to re-learn a better stance and grip so I can double tap accurately.  I have a long way to go!

One of the equipment needed is a proper magazine pouch as opposed to holding magazines with my jeans pocket.  Of all the magazine pouches out there, I like the magnetic ones that allow you to quickly (or sloppily) return an empty mag instead of dropping it on the floor.  But all competition related gear are very expensive, and I wasn’t ready to spend $40 a pop for those fancy magnetic mag pouch.

Here’s what I ended up buying:

  • Cheap paddle magazine pouch from Ebay ($15)
  • Neodymium magnet from Zoro ($5 each)

IMG_3727

The process is pretty simple. I cut open two sides of the pouch to make an opening, then I drill holes for the magnets to be screwed on with nuts and bolts.  The bolt was too long so I did have to Dremel out the remaining portion.

The magnets are very powerful and actually makes it pretty hard to pull the magazine out.  I ended up putting a piece of cardboard paper before wrapping the magnet with duct tape so I get a good combination of grip and force.

IMG_3729

Here is what the finished prototype looks like.  I think I’m better off mounting the upper magnets even higher.  I’ll use it at the range and actually try it out before making further improvements.

IMG_3732

The PPQ Rattle Explained

There’s been a few discussions about how the Walther PPQ gives off a rattle when you shake the gun, whereas the VP9 and many other guns do not give off a rattle at all, with some concluding that the PPQ is of lesser quality than other handguns such as the VP9.

This impression is somewhat disturbing as I’ve stripped both guns apart completely, and I noticed nothing that would indicate how one pistol is of superior quality in fit and finish than another gun.  In fact, I found the PPQ to be more accurate of a pistol.

So what’s the deal?

To get to the bottom of the issue, let’s first measure the actual frame to slide fit of each pistol, and see if it’s true that the PPQ is more “sloppy”.

VP9 slide to frame fit:

Rail thickness – 0.0700″
Slide groove opening – 0.0750″
Amount of play – 0.0050″

PPQ slide to frame fit:

Rail thickness – 0.0595″
Slide groove opening – 0.0620″
Amount of play – 0.0025″

So mechanically speaking, the PPQ has a tighter slide to frame fit and has less play involved.  Then why would the PPQ rattle?

The answer lies not in the pistol’s fit and finish, but how hard the recoil spring is pushing the slide against the frame when the pistols are in battery.

The first picture shows the position of the markers when the gun is in battery, I put a masking tape on, then cut the tape with a razor blade between the slide and the frame.

IMG_3735

Then I took off the slide lock so that the recoil spring is returned to its neutral position held together by the guide rod:

IMG_3734

Difference in distance between slide unlock and locked positions:

VP9 – 0.105″
PPQ – 0.02″

Having to travel 0.1 inch, the higher compression of the VP9’s slide against the frame means there’s a constant pressure pushing the slide up and away from the frame at all times.  In fact, it takes about 3lbs of force to push or wiggle the slide against the frame.  The PPQ on the other hand, barely applied any force on the frame, making the slide able to wiggle freely.

Does this difference in design determine fit and finish quality?  Obviously not.  It does raise the question of “would a difference in initial compression of the recoil spring make a difference in felt recoil”?  Now that’s a much more interesting question.  Almost everyone talk about how the PPQ has a stronger felt recoil than the VP9, but the bore axis on the PPQ is only about 0.1″ higher than the VP9.

Update: (July, 2016)

Having tried a soft recoil spring on my PPQ, I’ve noticed that there weren’t that much of a difference in recoil.  The fact remains that the PPQ has a stronger flip than the VP9.

But back to the worry over the PPQ rattle.  Conclusion here is that rattle comes from recoil spring placement and strength, not a sign of higher or lower quality on a polymer pistol.  Perhaps what’s more important are factors such as accuracy, trigger group, reset, and other factors that actually determine accuracy and longevity of a pistol.  All these categories combined still outweigh the higher muzzle flip on the PPQ.

1911 Magazine Types and Mod

I currently have 1911 9mm magazines from MetalForm, Dan Wesson, and Mecgar.  Everything worked fine when I was shooting round nose ammo, but the moment I switched to my hollow point ammo, all hell broke loose.  I simply get failure to feed on a full mag, and the problem seem to only happen on the MetalForm and Dan Wesson magazines.

Diagnostics

The problem here is that the ammo “nose dives” as it is being fed.  Normally it isn’t a problem with round nose bullets, but it seems like when I’m shooting with hollow point, the very front of the flat end doesn’t quite clear the bottom of the barrel ramp, causing the ammo to get stuck.

IMG_3637 IMG_3638 IMG_3651

Types of Magazines

I noticed that the MetalForm magazines raises their front lip to form its own ramp, probably for solving feeding problems with non-ramped barrels.  Which means if I want my Mecgar magazines to work, I’ll need to add a ramp of my own.

IMG_3652 IMG_3653IMG_3649

Mod

Time to bust out the old welder and see what I can do.  Took a while for my rusty old hands to make a mess on the magazine’s front lip, but after some grinding and filing, looks like we have ourselves a new ramp on the magazine.

IMG_3641 IMG_3644IMG_3645

IMG_3655

Winchester WSF win

My training for rapid fire had started, and among learning new stance and proper grip, I’m now burning 200 rounds per hour.  Things get real expensive if I don’t keep reloading!

My pistol of choice during my learning period is my trusty 9mm 1911 running on my 80% TM frame.  I was always unhappy about how I messed up on the barrel to slide fit, and the slide to frame fit also has a bit of play.  Though at the same time I don’t worry about banging up this gun, and its grip is perfect for what I need right now.

IMG_8838

Powder of choice here is the Winchester WSF.  It burns pretty clean, takes less powder than my other favorite (Power Pistol), and is also cheaper per pound.  I just needed a recipe that works, but after a few rounds of testing, I was really surprised how accurate this beater can achieve!

IMG_3628

With all its flaws, I can still keep the group down to 0.9 inch at 25 yards.  One great tip that I learned from others is that you should not only vary the powder weight, but also the COAL when testing out different loads.  Here is a list of the variances that I went through.

Powder Bullet OAL Load Group
WSF Montana Gold 115 1.15 4.9 2
WSF Montana Gold 115 1.145 4.9 3.5
WSF Montana Gold 115 1.14 4.9 2.5
WSF Montana Gold 115 1.15 5.1 3
WSF Montana Gold 115 1.145 5.1 3.5
WSF Montana Gold 115 1.14 5.1 1.5
WSF Montana Gold 115 1.155 5.2 2.5
WSF Montana Gold 115 1.15 5.2 2.5
WSF Montana Gold 115 1.145 5.2 0.9
WSF Montana Gold 115 1.14 5.2 1.6
WSF Montana Gold 115 1.15 5.3 2.5
WSF Montana Gold 115 1.145 5.3 2.5
WSF Montana Gold 115 1.14 5.3 3
WSF Montana Gold 115 1.155 5.4 2.5
WSF Montana Gold 115 1.15 5.4 4
WSF Montana Gold 115 1.145 5.4 4.5
WSF Montana Gold 115 1.14 5.4 2.5

PPQ – 4″ vs 5″, Light vs Heavy Trigger

Recently found that the Speer Lawman is incredibly accurate on my PPQ, so I took both my PPQ’s out to the range yesterday and had some fun with them, and did some completely unfair comparisons. 🙂

IMG_0840

Nobody should be surprised that the 5″ gun can shoot better than the 4″.  One particular note is that it’s easier for my untrained finger to get a flyer when the trigger is heavier, which also shouldn’t be a surprise.

IMG_0844

After 15 shots.  You can see that the 4″ is getting about 2.5″ group omitting that one flyer while the 5″ has a 2″ group with no flyers.  I suspect that the difference would be less if I’m shooting bench.  Afterall the trigger doesn’t affect mechanical accuracy, just let me get away with less discipline. 🙂
IMG_0831What’s interesting is that at 15 yards I can see the target a lot better, and being able to get great accuracy with the 5″ PPQ becomes a cakewalk.  I seemed to have struggled with the 4″, but it might be because my fingers were getting tired.

As many had pointed out already, the inherent accuracy of a 4″ vs 5″ gun is pretty much equal, and it all comes down to how the front sight being further away help with aiming, and I totally agree.  I think the 25 yard results is a much better representation, which is about a 0.5″ gain at 25 yards.

Someday I should compare two guns at the same trigger weight to be more fair. 🙂

Here are all my PPQ related posts – https://lanzerbot.wordpress.com/category/ppq/